AZUpload.ps1
Overview
This .ps1 will assist with importing local PST data into Office365 mailboxes
It works by bulk uploading PST files into a free ingestion folder provided by AzureAD
Then a CSV file instructs Office365 as to which PST files go into which mailbox (or mailbox archive)
These ingestion folder self-destructs 30 days (after the last file upload)
Basically, this guide is based on this guide from Microsoft: PST Import
Microsoft Guide see also SymmetrixTech guide
However, using this script you can avoid all the command line stuff
Step by Step
- Give yourself the Import Role (You only do this once per O365 Org)
Admin Centers > Exchange Admin Center > Permissions (left) > admin roles (top) > Organization Management > Edit > Add Role: Mailbox Import Export
(May take 24 hours)
- Setup the AZUpload program (On a computer with disk space and fast upload)
Download AZCopy.exe tool from here: https://aka.ms/downloadazcopy and install
Download Azure Storage Explorer (optional)
https://azure.microsoft.com/en-us/features/storage-explorer
Copy this program folder AZUpload to C:\AZUpload (or D:, there is no setup program)
AZUpload.ps1 (right-click) > Run
Run through the program once, just clicking OK on the defaults, to create the folder structure it uses.
- Copy the PST files into 1-Stage subfolder
Put each person’s PST files in folders according to their email address (without the @domain)
This way the program knowns which files go to which mailbox.
C:\AZUpload\1-Stage\<username>
C:\AZUpload\1-Stage\jsmith\pstfile1.pst
C:\AZUpload\1-Stage\jsmith\pstfile2.pst
C:\AZUpload\1-Stage\tjohnson\pstfile1.pst
C:\AZUpload\1-Stage\tjohnson\pstfile2.pst
- Understand people’s mailbox sizes and archive ON/OFF status
Note: The user must already have an archive mailbox
See ‘How to turn on Archive Mailbox’ below
- Create an O365 Import job
Admin Centers > Security & Compliance Center (Office 365 compliance center)
https://compliance.microsoft.com/homepage
https://protection.office.com/import
Data governance/Information governance(left) > Import (top) > click 'New import job' button
Note: If you don't see 'New import job' then you have to add the role (or wait 24 hours)
Job Name: jsmith202101 (or whatever, all lowercase, no hyphens, no spaces)
Job Method: upload your data
- Show SAS URL/URI: Click the link 'show network upload SAS URL' and keep it for later
(Skip this step if you are doing a 2nd or 3rd pass of uploads, you don't need another SAS URL)
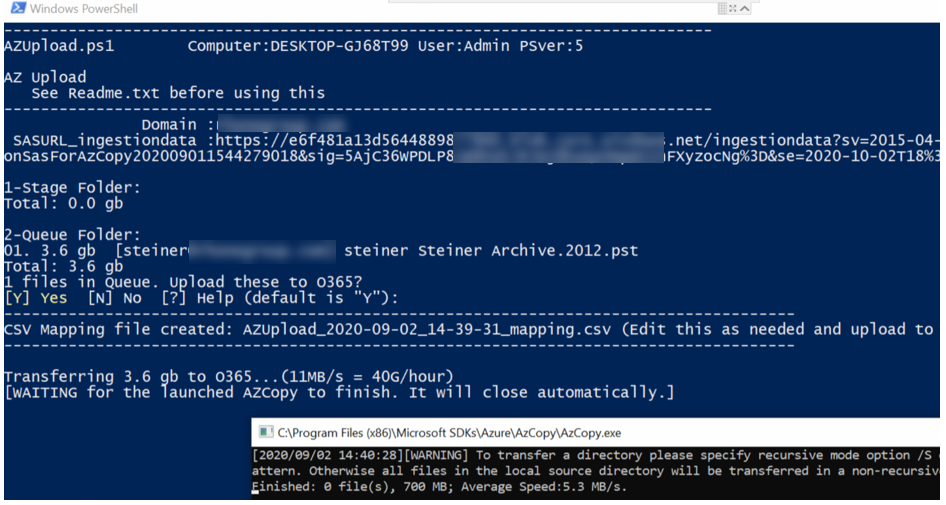
- Run the AZUpload.ps1
Give it your email domain
Give it the SAS URL (from your import job above)
| It will move the files through 3 folders (it will make 2 and 3 if needed)
1-Stage\<username>\.pst files This is where the .pst files start out Create a folder for each user and dump their PST files in the folder <username> must match the email address without the domain name Stuff in here will be renamed according to username and moved to queue folder
2-Queue Anything in this folder will get pushed as-is to O365 It is important to avoid name collisions since O365 ingestion folder is flat Normally this folder is populated from 1-Stage but you can manually put files in here. As long as you follow the "<username> pstname.pst" format (since the first word is used to create the .csv mapping file)
3-Sent After successful send to O365 files are finally moved here
|
Between Queue and Sent it will launch AZCopy.exe (minimized) and show progress
It's moving even though may say the word finished (fyi 11 MB/s is about 40G / hour)
Note: If you click inside the minimized AZCopy black screen (cmdline screen) and it seems to freeze it may be paused. Press spacebar to unpause. This is standard DOS program behavior.
| Azure Storage Explorer (optional)
Run Azure Storage Explorer to see the files in temp cloud (first time) Storage Accounts (right-click) > Connect to Azure Storage Display name: (job name from above) URI: (SAS URI from above)
|
- ps1 will continue uploading in the background.
Mapping files and log files are in the root.
When it finishes it will say Done, but you should be able to continue with the remaining steps while it uploads.
- Fix up the CSV - main mailbox or archive mailbox
FALSE meaning ‘main mailbox’
TRUE if you want to put files in the ‘archive mailbox’ (default)
Note: The user must already have an archive mailbox
See ‘How to turn on Archive Mailbox’ below
The last column has a ‘/’ meaning root folder (mixed in with the existing mail) or you could put something like ‘/ImportedPst’ and it will create a subfolder
Name,Mailbox,IsArchive,TargetRootFolder
jsmith JS 2008.pst,jsmith@cscapitaladvisors.com,FALSE,/
jsmith JS 2013 Part1.pst,jsmith@cscapitaladvisors.com,FALSE,/
jsmith JS Archive.2013.pst,jsmith@cscapitaladvisors.com,FALSE,/
- Upload CSV to Microsoft
Back on the web page for your job:
Tick 'I'm done uploading'
Tick 'I have access to the mapping file'
Upload your CSV
Click 'Validate'
Your file will be validated and analyzed. (may take a minute for it to register in the cloud, keep trying)
Click 'Save'
- Import from AZcloud to mailbox (this is all in the cloud)
You should get an Email confirming it's done.
Or just refresh the web page until it says Status=Analysis completed
Open the job and Click (Ready to) Import to Office 365 and import it
Click 'No I want to import everything' (it will detect that it’s old data and warn you)
Go ahead and Import
- Wait for import to finish
You can monitor progress on the web page until it is finished.
You will get an email when it is finished too.
- Retention policies – turn off retention hold (Optional but eventually should be done)
- Overview
The import process suspends Retention policies (Sets RetentionHold Enabled = $true)
for the user. The policy, normally / when unheld, moves older mail automatically to the archive (if there is one).
The hold is put in place so that data impored doesn’t get again moved by the retention polices, which would be confusing (e.g. import to main mailbox, but its old, so the policy moves it to the archive).
When it’s done, turn off, the hold:
There’s no way to do this in the EAC, you must use powershell.
- Turn OFF retention holds
Go ahead and paste (one by one), the uncommented lines into the BLUE command line area and press enter after each
## Retention Hold ## show all mailboxes that have it ON Get-Mailbox * | Where-Object RetentionHoldEnabled -EQ $True| Select Name, RetentionHoldEnabled ## turn it OFF for those that have it ON Get-Mailbox * | Where-Object RetentionHoldEnabled -EQ $True| Set-Mailbox -RetentionHoldEnabled $false |
- You are done!
The user should now see (automatically) an archive mailbox underneath their normal mailbox (In both Outlook and Outlook for Web).
Appendix
How to turn on Archive Mailbox
Note: The user must already have an archive mailbox
(old) Exchange admin center > Recips > Mailboxes > Mailbox Features (left) > Archiving > Enable
(new) EAC > Mailboxes > User > Manage mailbox archive > ON
By default, people’s archive mailbox is OFF. If they are near their main mailbox threshold, archiving should probably be turned ON.
If you the user doesn’t have an archive mailbox, CSV rows that target the archive will fail.
To turn on the Archive mailbox for a user (turn on In-Place Archive)
EAC > Mailboxes > User > Edit (Pencil on top) > Mailbox Features (left) > Archiving > Enable
Note: If Enabled – this area shows Archive size plus option to Disable (which permanently deletes the mail in Archive)
What are the storage limits for mailboxes / archive mailboxes?
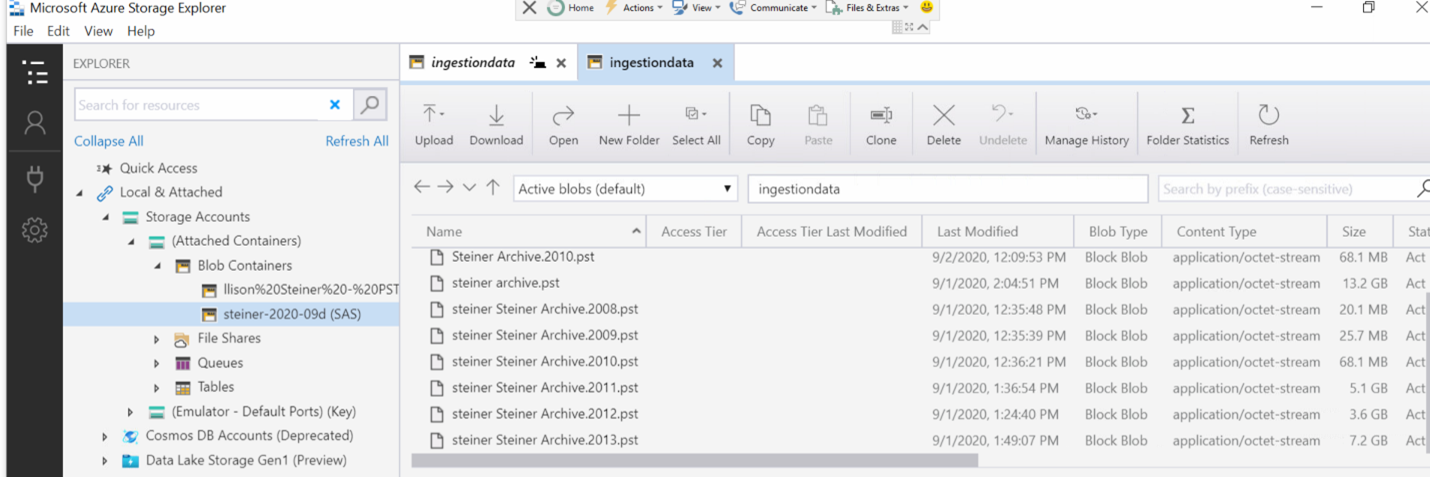
Using Azure Storage Explorer
This is a free tool to browse your temp storage area in the cloud
Azure Storage Explorer – cloud storage management | Microsoft Azure
To update: Just click the menu item to Check for Update
To see storage: Press the connect (plug icon) on the left
Connect to Azure Storage: Use a shared access signature (SAS) URI
Paste in your URI
To import files that were uploaded into AZExplorer storage
You will notice using the Azure Storage Explorer that successive uploads all go to the same ‘Ingestion Data’ area for the Org. Even though the SAS URI values vary.
Knowing this, you can create a CSV file and import job based on the PST files already in storage:
- Go to the page showing the Import PST files job lists and click ‘Download list of PST Files’
- Open that list and paste the filenames into a new CSV based on an earlier upload.
- Then start a new import job and skip right to the upload CSV file, it should validate